-
Release Notes
- July 8, 2024
- May 22, 2024
- April 17, 2024
- March 20, 2024
- February 22, 2024
- January 18, 2024
- 2023 Releases
- 2022 Releases
-
2021 Releases
- December 20, 2021
- December 1, 2021
- November 22, 2021
- November 4, 2021
- October 26, 2021
- September 30, 2021
- September 22, 2021
- September 2, 2021
- August 16, 2021
- August 2, 2021
- July 19, 2021
- July 1, 2021
- June 17, 2021
- June 1, 2021
- April 30, 2021
- April 8, 2021
- March 25, 2021
- March 15, 2021
- February 25, 2021
- February 8, 2021
- January 28, 2021
- January 21, 2021
- January 13, 2021
- 2020 Releases
- Getting Started
- Ports
- Cross Connects
- Point-to-Point
- Virtual Circuits
- Cloud Connections
- Cloud Router
- Marketplace & IX
- Administration
- Billing
- Troubleshooting & FAQ
- Technical Reference
- Partners Portal
- API & Automation
Point-to-Point Connection Details
To view the connection details, select Point to Points in the menu on the left. Click one of the table rows to view an overview of that connection. For complete information, click Details overview.
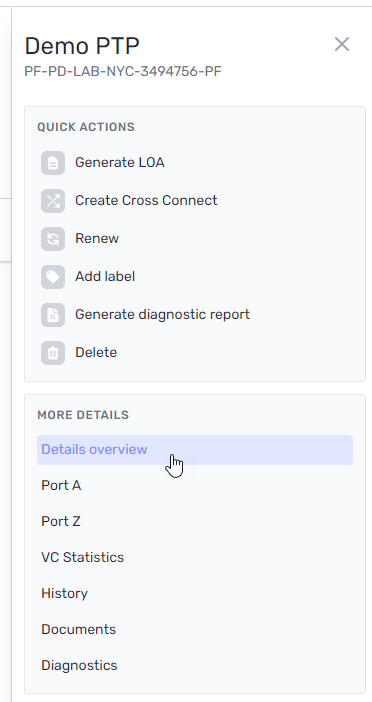
For information about the other pages available on the details page, see Point-to-Point Connection Details Pages .
Details
Status
Status can have the following values:
- Active
- Deleted
- Provisioning
NOTE: On rare occasions, you might order a port at a location in which there is a temporary lack of pre-configured ports. When this happens, your port remains in the Provisioning state for 1-3 business days as we manually complete its configuration.
An informational message should appear in the portal as you create the port letting you know about any lead times before you proceed.
- Header Row
- Field
- Description
- r
- Description
- The name you provided for the connection.
- r
- Circuit ID
- A unique identifier for this connection that includes the metros in which the interfaces are located.
- r
- Package
- The product type.
- r
- Time Created
Time Updated - The date and time the connection was created and updated (if applicable).
- Time Created
Billing
Charges begin to accrue 24 hours after you create a port (allowing you to cancel your order without incurring costs). Billing begins 15 days after the port is created or becomes operational, depending on what happens first. See Port Terms and Billing .
This also applies to the ports in a point-to-point connection.
The billing status tells you how many days you have until billing begins. After billing begins, billing is Active and this field tells you when billing started.
This section reflects your pricing plan, speed, rate, and term.
You can upgrade the connection to extend your contract term.
Optical light levels
Fiber optic connections work by translating binary data into light. The light is then transmitted through fiber cabling using different pulses, wavelengths, and intensity to convey that data.
The optical light level is the strength of that light when it is transmitted on one end and received on the other.
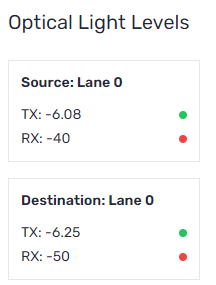
Optical light levels are measured in terms of transmitted power (TX) and received power (RX). Light lanes are the electrical lanes in the optic interface. The example below is a 40G optic, which has four lanes:

When working correctly, the optical signal strength should fall within a certain power range. A green dot next to the RX/TX value indicates a healthy connection; a red dot indicates that either the optic levels are outside the acceptable range or that the cross connect has not been installed yet:
-
Optical power that is too high can saturate the receiver and prevent a clean decode, resulting in errors. This is typically caused by the wrong type of optic, a too-short fiber span, or an active device in the path (such as an amplifier or DWDM transponder).
-
Optical power that is too low can result in slow connections, connections that won’t pass data, and connections that might not link at all. This is typically caused by unseated or dirty patches, a bad cross connection, or a longer fiber span than expected.
If your optical light levels are consistently too low, you can have the patches cleaned, scoped, and replaced as needed.
Related Links
Updated on 02 Mar 2026