The process for adding an AWS connection depends on whether you are using an AWS access key
:
- Provision with a key
- From the PacketFabric portal you can provision the connection, automatically accept it from the AWS side, and create an associated VIF.
- Provision without a key
- From the PacketFabric portal, you only provision the Cloud Router connection. When that is completed, you must return to the AWS Management Console to accept the connection and create the VIF.
Provision using an AWS access key
Prerequisites
Before you begin, you will need the following:
- You will be asked for your AWS account number. This is available under your user name in the upper right of the AWS Management Console.
- An access key tied to the account you listed above. See AWS Credentials
.
- At least one AWS VPC with subnets already created.
Create a connection
-
Log in to the PacketFabric portal. Select Hosted Cloud from the menu on the left.
-
From the Hosted Clouds page, click Create Hosted Cloud in the upper right.
NOTE: Read Only users do not see this action. If you need to create a connection and have Read Only permissions, contact your account administrator.
Complete the following fields:
Select Cloud Provider
Select AWS.
Select Source
Select the source port. The source port is the PacketFabric access port directly connected to your network.
If there is nothing to select, provision a new port
.
Configuration
- OnRamp
- The AWS on-ramp location. This cannot be changed after it is provisioned.
- Zone
- Select an availability zone.
- The zone refers to the physical interconnect diversity between PacketFabric and AWS (e.g. different routers).
- Allocating connections within different zones supports redundancy.
- Speed
- The speed you want for your connection.
- Amazon account ID
- Enter your Amazon account ID.
- This allows PacketFabric to send API requests to Amazon on your behalf.
- Source VLAN
- This is the VLAN ID that faces your source interface (your source network).
- You can manually enter the ID or click Next Available. If you click Next Available, we find the highest in-use VLAN ID and increment by one. For example, if the highest in-use ID is 15, this field autopopulates with 16.
-
NOTE: You cannot specify the VLAN ID facing AWS; it is automatically configured on your behalf. However, this does not affect your ability to use the AWS hosted connection.
-
NOTE: This field is not available if provisioning a marketplace-to-cloud connection. In that case, the marketplace provider will specify the VLAN when accepting the connection.
- Description
- Enter a description for the connection.
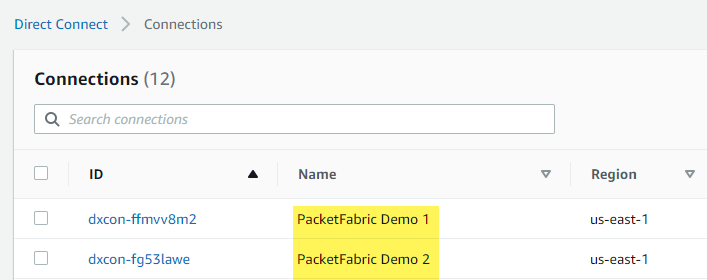
- This description appears in the Name column when viewing your connections in the AWS portal:
- Provision AWS side of the connection
- Select this option.
- When selecting this option, note the following limitations:
- You cannot specify a different AWS account owner for the VIF. The VIF must be owned by the same AWS account ID you specify above.
- If the on-ramp and zone you selected above does not support instant provisioning (meaning there is a lead time for the on-ramp), you will need to create the VIF in the AWS Management Console after the on-ramp is available. See Requesting hosted locations
.
- This is not supported when selecting a marketplace provider as a source port.
Virtual Interface (VIF) type
-
Header row
-
r1
- Private VIF
- Access a single Amazon VPC using a Direct Connect Gateway and a Virtual Private Gateway.
-
r2
-
Transit VIF
-
Access one or more Amazon VPCs using a Direct Connect Gateway and a Transit Gateway.
Note that when provisioning through PacketFabric, you will only be able to select one VPC. You can use the AWS Management Console to attach additional VPCs to the Transit Gateway.
-
r3
- Public VIF
- Use public IP addresses to access AWS public services (such as S3) that are not in your VPC. Public VIFs are not attached to gateways.
AWS settings
- AWS credentials
- Select a set of credentials tied to the AWS account ID you entered above or enter new ones.
- If you do not have any credentials set up, see AWS Credentials
for information on obtaining them.
VIF settings
For more information, see AWS docs - Create a private virtual interface and AWS docs - Prerequisites for virtual interfaces.
Private VIFs must be attached to a Direct Connect Gateway. (Meaning we do not support attaching a Private VIF directly to a Virtual Private Gateway.)
- Region
- The region you select determines what Virtual Private Gateways and VPCs will be available for selection. By default, this is set to the same region as your on-ramp.
- Direct Connect Gateway
- Select a Direct Connect Gateway or create a new one.
- If you select an existing Direct Connect Gateway, it cannot already have a Transit Gateway attached in any region.
- BGP Amazon ASN (Direct Connect Gateway)
- If you are creating a new Direct Connect Gateway, you can use this field to specify an ASN for the gateway. Valid ranges are 64512 - 65534 and 4200000000 - 4294967294.
- If you selected a preexisting Direct Connect Gateway, then this field is auto-populated and not editable.
- Select Private Gateway
- Select a Virtual Private Gateway or create a new one.
- The Virtual Private Gateways that appear must meet the following criteria:
- It is within the region you selected above
- It already has a VPC attached.
- It is not already associated with a Direct Connect Gateway.
If you do not already have a Virtual Private Gateway that meets that criteria, you can create one.
- BGP Amazon ASN (Virtual Private Gateway)
- If you are creating a new Virtual Private Gateway, you can use this field to specify an ASN for the gateway. Valid ranges are 64512 - 65534 and 4200000000 - 4294967294.
- If you selected a preexisting Virtual Private Gateway, then this field is auto-populated and not editable.
- VPCs
- If you selected a preexisting Virtual Private Gateway, then this field displays information about the VPC that is already attached to that gateway.
- If you are creating a new Virtual Private Gateway, then the list of available VPCs appears. The VPC you select will be attached to your new gateway.
- The VPCs that appear must meet the following criteria:
- It is within the region you selected above
- It has not already been attached to another Virtual Private Gateway.
If you do not have a VPC that meets this criteria, you will need to return to the AWS Management Console and create one.
- BGP Customer’s router ASN
- The ASN to use with your router when establishing the BGP session.
- This can be from 1 to 2147483647 (a public ASN owned by you or a private one between 64512 - 65534).
Advanced settings
- Address family
- Select IPv4 or IPv6 to use for peering.
- BGP router IPs
- If you selected IPv4, you can specify your own IP addresses for the routers in the BGP session or leave these fields blank to allow AWS to allocate IPv4 addresses on your behalf.
- If you select IPv6, Amazon automatically allocates an /125 IPv6 CIDR on your behalf.
- MTU settings
- Select 1500 or 9001 (jumbo frames).
- BGP authentication key
- You can specify your own authentication key, or leave this blank to have AWS generate one on your behalf.
- Allowed prefixes
- List of prefixes you want to be allowed to be advertised to the on-premises network through the Direct Connect Gateway.
- By default, this is populated by the subnets within the attached VPC. You can add or remove subnets here, or you can manage them later using the AWS Management Console.
VIF settings
For more information, see AWS docs - Create a transit virtual interface to the Direct Connect gateway and AWS docs - Prerequisites for virtual interfaces.
- Region
- The region you select determines what Transit Gateways and VPCs will be available for selection. By default, this is set to the same region as your on-ramp.
- Direct Connect Gateway
- Select a Direct Connect Gateway or create a new one.
- If you select an existing Direct Connect Gateway, it cannot already have a Virtual Private Gateway attached in any region.
- If you have an existing Direct Connect Gateway and do not see it listed here, it means that the gateway already has a Virtual Private Gateway attached in the region specified above. You can create a new gateway or you can change regions.
- Note that while AWS allows up to three Transit Gateway associations for a Direct Connect Gateway, this must be done through the AWS Management Console. See AWS Direct Connect quotas.
- BGP Amazon ASN (Direct Connect Gateway)
- If you are creating a new Direct Connect Gateway, you can use this field to specify an ASN for the gateway. Valid ranges are 64512 - 65534 and 4200000000 - 4294967294.
- If you selected a preexisting Direct Connect Gateway, then this field is auto-populated and not editable.
- Transit Gateway
- Select a Transit Gateway or create a new one.
- The Transit Gateways that appear must meet the following criteria:
- It is within the region you selected above
- It already has a VPC attached.
If you do not already have a Transit Gateway that meets that criteria, you can create one. Note that you are only allowed 5 Transit Gateways per account. See AWS docs - Quotas for your transit gateways.
- BGP Amazon ASN (Transit Gateway)
- If you are creating a new Transit Gateway, you can use this field to specify an ASN for the gateway. Valid ranges are 64512 - 65534 and 4200000000 - 4294967294.
- If you selected a preexisting Transit Gateway, then this field is auto-populated and not editable.
- VPCs
- If you selected a preexisting Transit Gateway, then this field displays information about the VPC that is already attached to that gateway.
- Note that if the Transit Gateway has multiple VPCs attached, you will still only see one VPC listed.
- If you are creating a new Transit Gateway, then the list of available VPCs appears. The VPC you select will be attached to your new gateway.
- This list only includes VPCs within the region you selected above. The VPC must already have a subnet. If you do not have a VPC that meets this criteria, you will need to return to the AWS Management Console and create one.
- Subnets
- Select subnets from the VPC.
- BGP Customer’s router ASN
- The ASN to use with your router when establishing the BGP session.
- This can be from 1 to 2147483647 (a public ASN owned by you or a private one between 64512 - 65534).
Advanced settings
- Address family
- Select IPv4 or IPv6 to use for peering.
- BGP router IPs
- If you selected IPv4, you can specify your own IP addresses for the routers in the BGP session or leave these fields blank to allow AWS to allocate IPv4 addresses on your behalf.
- If you select IPv6, Amazon automatically allocates an /125 IPv6 CIDR on your behalf.
- MTU settings
- Select 1500 or 8500 (jumbo frames).
- BGP authentication key
- You can specify your own authentication key, or leave this blank to have AWS generate one on your behalf.
- Allowed prefixes
- List of prefixes you want to be allowed to be advertised to the on-premises network through the Direct Connect Gateway.
- By default, this is populated by the subnets within the attached VPC. You can add or remove subnets here, or you can manage them later using the AWS Management Console.
VIF settings
- Customer’s router ASN
- The ASN to use with your router when establishing the BGP session.
- This can be from 1 to 2147483647 (a public ASN owned by you or a private one between 64512 - 65534). Note that AS prepending does not work if you use a private ASN for a public VIF.
- Address family
- Select IPv4 or IPv6 to use for peering.
- BGP router IPs
- If you select IPv4 peering, you must provide a public IPv4 address owned by you.
- If you select IPv6, Amazon automatically allocates an /125 IPv6 CIDR on your behalf.
Advanced settings
- BGP authentication key
- You can specify your own authentication key, or leave this blank to have AWS generate one on your behalf.
Prefixes to advertise
The IPv4 destination addresses that you want to advertise to AWS. Note that AWS will drop any packets whose source is not within these ranges.
For additional guidelines for these prefixes, see AWS docs - Prerequisites for virtual interfaces.
Under the billing section on the right, select a term and the appropriate billing account to use. You can also optionally specify a PO number to associate with the service. The PO number will be included on your monthly invoice.
Click Place order.
Download a sample router config
Once the connection is provisioned, you can go to the details page of the Hosted connection.
From the Cloud Settings tab, click Download sample config:
From here you can select your router (or similar) and get a sample configuration file.
Provision without an AWS access key
Prerequisites
You will be asked for your AWS account number. This is available under your user name in the upper right of the AWS Management Console.
Create a connection
-
Log in to the PacketFabric portal. Select Hosted Cloud from the menu on the left.
-
From the Hosted Clouds page, click Create Hosted Cloud in the upper right.
NOTE: Read Only users do not see this action. If you need to create a connection and have Read Only permissions, contact your account administrator.
Complete the following fields:
Select Cloud Provider
Select AWS.
Select Source
Select the source port. The source port is the PacketFabric access port directly connected to your network.
If there is nothing to select, provision a new port
.
Switch source to Marketplace service
Rather than creating a connection from AWS to a PacketFabric access port that you own, you can build a virtual circuit from your cloud to a third-party network via the PacketFabric marketplace.
Click Switch source to Marketplace service:

Use the drop-down menus to select a marketplace member and location, and then complete the remaining fields as described below.
Configuration
- OnRamp
- The AWS on-ramp location. This cannot be changed after it is provisioned.
- Zone
- Select an availability zone.
- The zone refers to the physical interconnect diversity between PacketFabric and AWS (e.g. different routers).
- Allocating connections within different zones supports redundancy.
- Speed
- The speed you want for your connection.
- Amazon account ID
- Enter your Amazon account ID.
- This allows PacketFabric to send API requests to Amazon on your behalf.
- Source VLAN
- This is the VLAN ID that faces your source interface (your source network).
- You can manually enter the ID or click Next Available. If you click Next Available, we find the highest in-use VLAN ID and increment by one. For example, if the highest in-use ID is 15, this field autopopulates with 16.
-
NOTE: You cannot specify the VLAN ID facing AWS; it is automatically configured on your behalf. However, this does not affect your ability to use the AWS hosted connection.
-
NOTE: This field is not available if provisioning a marketplace-to-cloud connection. In that case, the marketplace provider will specify the VLAN when accepting the connection.
- Description
- Enter a description for the connection.
- This description appears in the Name column when viewing your connections in the AWS portal:
- Provision AWS side of the connection
- Leave this unselected.
- If you choose to proceed, see the instructions under Provision AWS side
below.
- If you skip this option, continue to Billing and then follow Complete setup in AWS
when the connection has finished provisioning.
Under the billing section on the right, select a term and the appropriate billing account to use. You can also optionally specify a PO number to associate with the service.
Click Place order.
Complete setup in AWS
If you chose not to select Provision AWS side of the connection, you will need to complete your setup in the AWS Management Console.
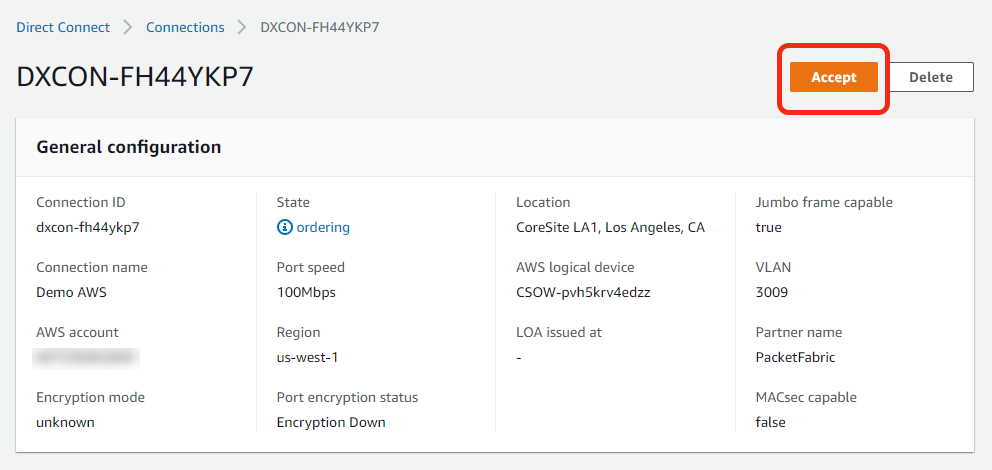
Accept the connection
-
Sign in to AWS.
-
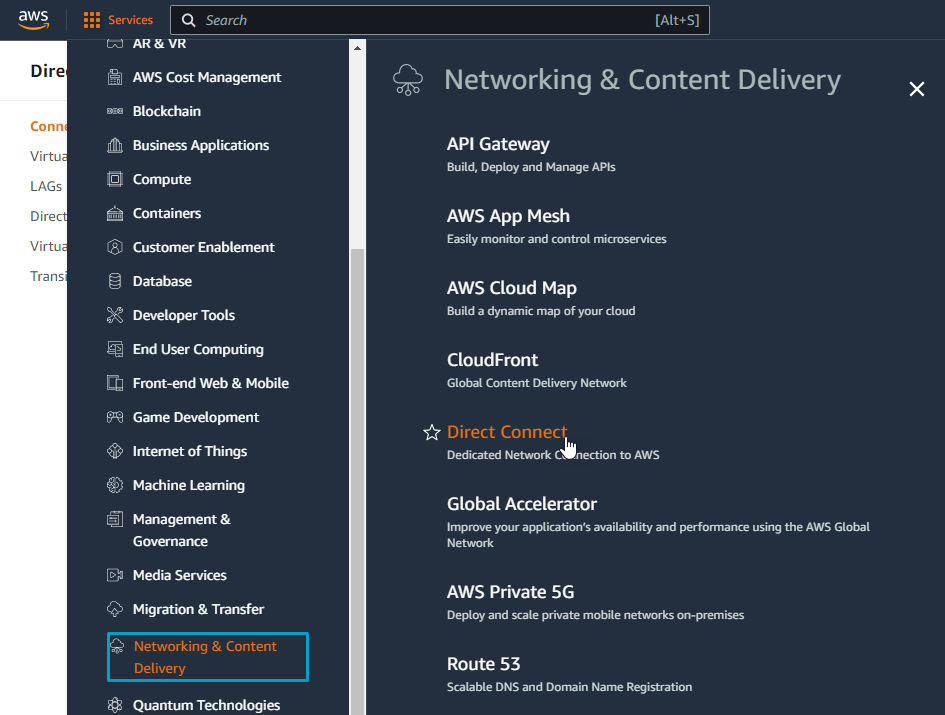
From the AWS Management Console, click the Services menu and select Networking & Content Delivery > Direct Connect.
-
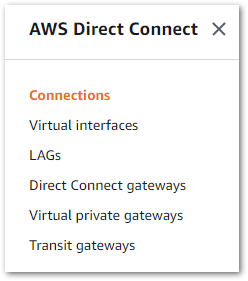
Click Connections.
-
Locate and select the connection you created in the PacketFabric portal.
-
Click Accept in the upper right.
-
Click Confirm.
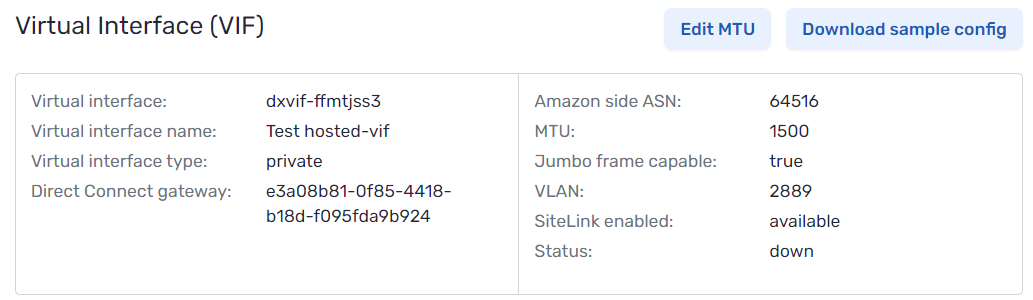
Create an AWS virtual interface
You will need to create a virtual interface (VIF) to associate with this connection. For more information, see the following AWS documentation: Amazon - Creating a Virtual Interface
Next steps (marketplace-to-cloud users)
Your connection remains disconnected until the other party accepts your request. Billing does not begin until the other party accepts and your circuit is provisioned.
You can cancel the request or view status under Network > Connection Requests. Click Sent Requests.
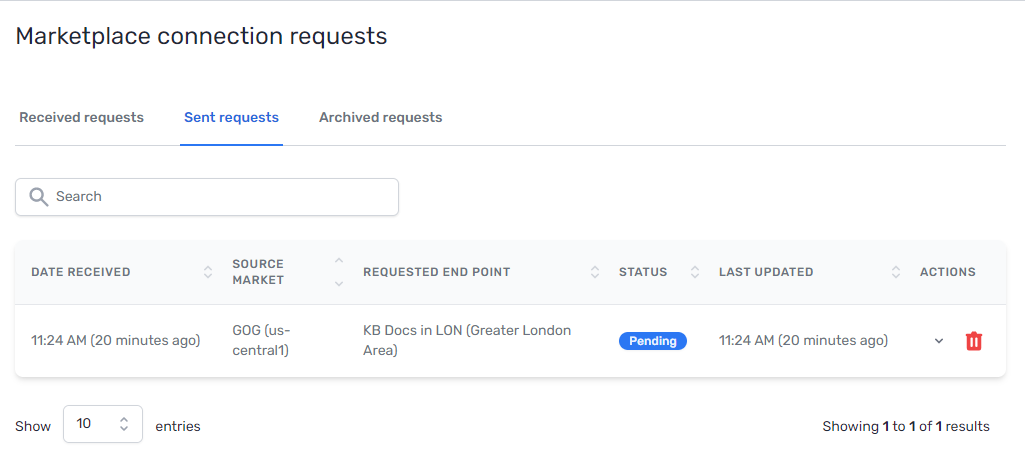
For more information, see Connection Requests
.