Create a Hosted Azure ExpressRoute Connection
Contents
Create an ExpressRoute circuit in the Azure portal
Create a PacketFabric Hosted Connection
Create the secondary connection
Configure peering
Create and link a virtual network gateway
Prerequisites
-
Before you begin, you should already have a PacketFabric port and cross connect in place. For more information, see Create a Port .
-
Review the steps outlined in the process overview .
Create an ExpressRoute circuit in the Azure portal
-
From the Microsoft Azure portal, use the search bar to find the ExpressRoute circuits page.

-
Click Create.

-
Under Basics, complete the following fields:
-
Header row
- Field
- Description
-
Row 1
- Subscription
- Your subscription is created at the account level and determines how you are billed.
-
Row 2
-
Resource group
-
The resource group is like a directory folder. You can use resource groups to perform bulk operations on resources. For example, you can cascade permissions, create copies, delete groups, and so on.
Each resource can only belong to one group, and the group can only belong to one subscription.
-
-
Row 2
-
Region
-
Select the Azure region that works best for you. This region represents the availability zone or data center in which a resource is located.
The region does not need to be the same as the PacketFabric on-ramp. For example, you might want to keep resources that are in a group within the same region or spread them among various regions for redundancy.
-
-
Row 2
- Name
- Provide a meaningful name for the circuit.
-
-
Under Configuration, complete the following fields:
- Header row
- Field
- Description
- Row 1
- Port type
- Select Provider.
- Row 2
- Create new or import from classic
- Create new.
- Row 2
- Provider
- Select PacketFabric.
- Row 2
- Peering location
- Select from the available locations. This is the PacketFabric on-ramp.
- Row 2
- Bandwidth
- Select your capacity.
- Row 2
-
SKU
-
Select your service tier.
The Premium add-on allows connectivity between geopolitical regions, more prefixes, and more virtual network connections. For more information, see Microsoft - What is ExpressRoute premium?
-
- Row 2
-
Billing model
-
Select the appropriate billing model.
This only applies to Microsoft’s billing model. All PacketFabric hosted cloud connections are billed separately and at a flat monthly rate.
- Metered: Billed according to usage.
- Unlimited: Pay a flat monthly rate.
-
- Row 2
-
Allow classic operations
-
No - This is the default selection, and is appropriate in most situations.
You would only need to select Yes if you are planning to connect to resources that were deployed under Azure’s classic model. This would include any resources created before 2014 that have not been migrated and/or post-2014 resources that you created through the classic portal.
-
- Header row
-
Under Tags, you can optionally add name/value pairs. Tags allow you to organize resources across resource groups. They can be applied to subscriptions, resource groups, and resources.
For example, you could use tags to note location (e.g.
city: richmondorbuilding: d) and environments (e.g.environment: testorstate: beta). -
Review your selections and click Create.
-
It might take a few moments for your circuit to deploy. When complete, click Go to resource.
 NOTE: If you do not see the Go to resource action, click Refresh or go to the resources page and re-select the ExpressRoute circuit.
 -
From the ExpressRoute circuit overview page, locate the service key and copy it to your clipboard.

IMPORTANT:
Each service key is unique to a specific circuit. Embedded within the service key is the following information:
Who: PacketFabric
Where: Peering location/on-ramp
How much: Bandwidth
You can use the service key twice: once for the primary connection, and again for the secondary connection.
But because they are so specific, you cannot reuse a service key across multiple regions or recycle them between circuits. For example, you can’t create two hosted connections to two different on-ramp locations using the same service key.
Microsoft begins charging you as soon as the service key is created, regardless of whether you have provisioned your PacketFabric connection.
Create a PacketFabric Hosted Connection
-
Log in to the PacketFabric portal. Select Hosted Cloud from the menu on the left.
-
From the Hosted Clouds page, click Create Hosted Cloud in the upper right.
NOTE: Read Only users do not see this action. If you need to create a connection and have Read Only permissions, contact your account administrator.
Complete the following fields:
Select Cloud Provider
Select Microsoft Azure.
Select Source
Select the source port. The source port is the PacketFabric access port directly connected to your network.
If there is nothing to select, provision a new port .

Configuration
- OnRamp
- The Microsoft Azure on-ramp location.
- Select the same location you selected when creating the ExpressRoute.
- Speed
- (Optional)
- This is the speed you are setting for your ExpressRoute circuit. Again, you should select the same speed you selected when creating the ExpressRoute.
- If you leave this field blank, the connection will automatically have the same speed you selected when creating the ExpressRoute circuit.
- Azure Service Key
- Enter the Azure service key that you copied from the ExpressRoute circuit overview page.
- Private peering VLAN
- The VLAN ID you are using for private peering. You will use this when you configure peering in the Azure portal.
- The VLAN ID must be unique within the circuit (not used for any other peerings).
- You can manually enter the ID or click Next Available. If you click Next Available, we will find the highest in-use VLAN ID and increment by one. For example, if the highest in-use ID is 15, this field autopopulates with 16.
- Microsoft Peering VLAN
- The VLAN ID you are using for Microsoft peering. This is optional and is used to connect to Office 365.
- Like private peering, the VLAN ID must be unique within the circuit (not used for any other peerings).
- Description
- Enter a brief description for the connection.
Under the billing section on the right, select a term and the appropriate billing account to use. You can also optionally specify a PO number to associate with the service. The PO number will be included on your monthly invoice.
Click Place order.
Create the secondary connection
Each Microsoft service key allows for a primary and secondary circuit connection. See the diagram in Microsoft ExpressRoute Overview .
The first time you use your Microsoft service key to set up a connection, PacketFabric automatically provisions your primary circuit connection.
If you set up another connection using the same service key, PacketFabric provisions the secondary circuit connection.
Use the same VLAN IDs, capacity, and on-ramp location you used for the primary connection.
However, you must select a different source port; we do not support landing both the primary and secondary connection on the same PacketFabric access port.
Configure peering
When the cloud connection has completed provisioning, return to the Azure portal and refresh the ExpressRoute overview page.
The provider status should update to the Provisioned status:

When you configure peering, you are asked to provide VLAN IDs. Use the IDs you provided when you created your PacketFabric circuit above.
To confirm which IDs you are using, navigate to the port details page for the source port and view the Active VCs table.
Private peering
Click Azure private to configure a private connection to your Azure VNet.

Select Enable peering and then complete the following fields:
- Row
- Field
- Description
- Row
-
Peer ASN
-
Enter your public or private ASN.
If you are using a private ASN, you cannot use numbers from 65515 to 65520. These are reserved for Microsoft’s internal use.
This means your private ASN can be selected from 64512 to 65514 and from 65521 to 65534.
-
- Row
-
IPv4 Primary subnet
-
This is a /30 subnet for your primary link. It can be a public or private IP address range, but it cannot be a range that is already being used in your Azure VNet.
Assign the first useable IP address to your router. Microsoft uses the second.
If you are using public IP addresses, they should not be advertised to the public internet.
-
- Row
- IPv4 Secondary subnet
- This is another /30 subnet. It follows the same rules as the primary subnet, but is used with your secondary link.
- Row
- VLAN ID
- This is the Private Peering VLAN ID you entered when creating the PacketFabric hosted connection. Use the same VLAN ID for both the primary and secondary links.
- Row
- Shared key
- An optional MD5 hash. This must be present on both sides of the tunnel and is limited to 25 characters. Special characters are not supported.
For more information, see the following Microsoft articles:
Microsoft peering
Set up Microsoft peering if you are using Microsoft 365 or Office 365 and would like to provide on-premises users with a dedicated connection. Microsoft 365 apps still require public internet endpoints.

Select Enable peering and then complete the following fields:
- Row
- Field
- Description
- Row
-
ASN
-
Enter your public ASN.
You can use a private ASN, but Microsoft will need to manually validate it before use. Microsoft will also remove private ASNs from the AS PATH for received prefixes. This means you cannot optimize routing for Microsoft peering.
As mentioned above, you cannot use private AS numbers from 65515 to 65520. These are reserved for Microsoft’s internal use.
-
- Row
-
Primary subnet
-
This is a /30 subnet for your primary link. This must be a valid public IPv4 prefix owned by you and registered in an RIR/IRR.
Assign the first useable IP address to your router. Microsoft uses the second.
While you must use a public IPv4 address range, it should not be advertised to the public internet.
-
- Row
- Secondary subnet
- This is another /30 subnet. It follows the same rules as the primary subnet, but is used with your secondary link.
- Row
- VLAN ID
- This is the Microsoft Peering VLAN ID you entered when creating the PacketFabric hosted connection. Use the same VLAN ID for both the primary and secondary links.
- Row
-
Advertised public prefixes
-
A list of IPv4 or IPv6 prefixes to advertise over the BGP session. These prefixes must be public and registered to you.
You can provide up to 200 prefixes in a comma-separated list.
-
- Row
- Customer ASN
- If you are advertising prefixes that are not registered to the peering ASN, you can use this field to specify the ASN to which they are registered. (Optional)
- Row
- Routing registry name
- The RIR/IRR in which your public IP prefixes and ASN are registered. (Optional)
- Row
- Shared key
- An MD5 hash. This must be present on both sides of the tunnel and is limited to 25 characters. Special characters are not supported. (Optional)
For more information, see the following Microsoft articles:
Create and link a virtual network gateway
Create a virtual network gateway for ExpressRoute
Before you continue, consider whether you want to utilize Azure’s zone-redundant gateways. For more information, see see High Availability and Redundancy in ExpressRoute Connections .
-
Use the search bar at the top of the Azure portal to find and select Virtual network gateways.

-
Click Add.

-
Under Basics, complete the following fields:
- Header row
- Field
- Description
- Row 1
- Subscription
- Select the subscription associated with your virtual network.
- Row 2
- Resource group
- The resource group is autopopulated based on the virtual network you select.
- Row 2
- Name
- Provide a meaningful name for the gateway.
- Row 2
- Region
- Select the region associated with your virtual network.
- Row 2
- Gateway type
- Select ExpressRoute.
- Row 2
-
SKU
-
Select one of the following:
- Standard/ErGw1AZ: 1,000 Megabits/second
- High Performance/ErGw2AZ: 2,000 Megabits/second
- Ultra Performance/ErGw3AZ: 10,000 Megabits/second
The SKUs that begin with
ErGwindicate that the gateway is in a zone-redundant region.If you are planning to implement FastPath, you must select the Ultra Performance gateway.
For more information about the differences between SKUs, see Estimated performances by gateway SKU.
-
- Row 2
- Virtual network
- Select the virtual network to which you are connecting.
- Row 2
-
Public IP address
-
Select a previously created IP address or create a new one. If you are using zone-redundant gateways, the IP address must have a Standard SKU.
For more information, see Microsoft - Public IP addresses.
-
- Header row
-
Click Next to add tags (optional).
-
Click Next and then Create.
Link a virtual network gateway to the ExpressRoute circuit
-
In the Azure portal, go to the overview page for your ExpressRoute circuit.
-
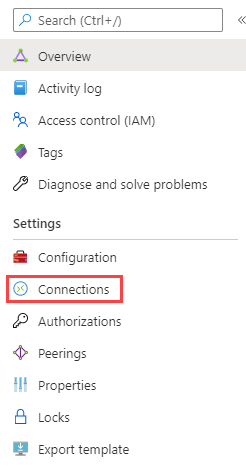
From the menu on the left, select Connections.
-
Click Add.
-
Provide a meaningful name and then click Next.
-
Under Settings, complete the following fields:
- Header row
- Field
- Description
- Row 1
- Virtual network gateway
- Select the gateway leading to the appropriate virtual network.
- Row 2
- Redeem authorization
- Select this if the virtual network is under a different subscription than the ExpressRoute circuit. For more information, see Microsoft - Connect a VNet to a circuit - different subscription.
- Row 2
-
Routing weight
-
The routing weight is relevant when both of the following conditions are met:
-
A virtual network is connected to multiple circuits,
AND
-
Those circuits are advertising the same network prefixes.
In that situation, traffic is sent to the ExpressRoute circuit with the highest routing weight. You can enter a value between 0 and 32000.
-
-
- Header row
-
Click Next to add tags (optional).
-
Click Next and then Create.
Next steps
If you are using Microsoft 365 peering, you also need to set up route filters. For more information, see Configure route filters for Microsoft peering .