Using Python Requests with the PacketFabric API
If you prefer to use a GUI interface, see Using Postman with the PacketFabric API .
Ensure you have the following installed:
If you are inexperienced working with Python, there are a few simple ways to experiment with the API.
-
You can use interactive mode by typing
python3orpythoninto a command line terminal and then press Enter. You can then execute code directly from the terminal.When you want to exit interactive mode, enter
quit()orexit(). You can also press Ctrl+Z and then Enter (Windows) or Ctrl+D (Unix-based). -
Open up a text file and enter the same commands. Save the file with the
.pyextension. You can then execute the file from the command line by enteringpython3 <filename>.py.While interactive mode is convenient for testing, you lose the code when you end your session.
Authenticating
Most PacketFabric API calls require authentication.
Bearer token via API key
You can use the PacketFabric portal to generate an API key. For more information, see API Keys .
Add your API key to your Python script as a variable, and then use that to construct a header to send with your requests. For example:
import requests

api_key = 'api-abcdef-ghijk-0123456-7890123-abcd-etcetc'

# Use the API key to construct a request header
request_header = {
    'Authorization': f'Bearer {api_key}'
}

# Specify the API call you want to do
activitylog_url = 'https://api.packetfabric.com/v2/activity-logs'

# Construct a GET request using the above URL and the request header with your key
activitylog = requests.get(activitylog_url, headers=request_header)

# Print results to the console.
print(activitylog.json())
Bearer token via API session token
Alternatively, you can use a session token that you obtain via the API.
If you just want to log in and get a token, you can use the following:
import requests
login_url = 'https://api.packetfabric.com/v2/auth/login'
login_payload = {
    'login': 'caitlin@packetfabric.com',
    'password': 'iloveknowledgebases!!'
}
login_request = requests.post(login_url, json=login_payload)
print(login_request.json())
To use your token with subsequent API calls,
import requests
login_url = 'https://api.packetfabric.com/v2/auth/login'
login_payload = {
    'login': 'caitlin@packetfabric.com',
    'password': 'iloveknowledgebases!!'
}
login_request = requests.post(login_url, json=login_payload)

# Extract the session token from the response and assign it a variable name
auth_token = login_request.json()['token']

# Use the session token to construct a request header
request_header = {
    'Authorization': f'Bearer {auth_token}'
}

# Specify the API call you want to do
activitylog_url = 'https://api.packetfabric.com/v2/activity-logs'

# Construct a GET request using the above URL and the request header with your token
activitylog = requests.get(activitylog_url, headers=request_header)

# Print results to the console.
print(activitylog.json())
API calls with parameters
To include additional parameters in your requests, simply add them to the call URL:
import requests

api_key = 'api-abcdef-ghijk-0123456-7890123-abcd-etcetc'
request_header = {
    'Authorization': f'Bearer {api_key}'
}

# Activity log call filtered for login events, limited to 5, and in descending order
activitylog_url = 'https://api.packetfabric.com/v2/activity-logs?event=login&page_size=5&sort_order=desc'

activitylog = requests.get(activitylog_url, headers=request_header)
print(activitylog.json())
Sending requests with JSON data
To include data (for example, with POST requests), you will need to create a separate variable with the data in JSON format. Then you will need to send that information in your request along with the header.
For example, the following creates a new technical contact:
import requests

auth_key = 'api-abcdef-ghijk-0123456-7890123-abcd-etcetc'
request_header = {
    'Authorization': f'Bearer {auth_key}'
}

contacts_url = 'https://api.packetfabric.com/v2/contacts'

# Information for the new contact in JSON format
contacts_json = {
  "email":"tony@packetfabric.com",
  "first_name":"Tony",
  "last_name":"deHamster",
  "phone":"123-456-7890",
  "admin":False,
  "tech":True,
  "billing":False
 }

# Ensure you change 'get' to 'post' and add the JSON variable to the request
newcontact = requests.post(contacts_url, json=contacts_json, headers=request_header)

# Print success response to the console
print(newcontact)True and False.“Name false not defined” error
This can also be NameError: name 'true' is not defined.
Capitalize True and False in your Python script.
“Not authorized” error
This has several causes:
- Your bearer token is no longer valid. Generate a new session token or API key (see above).
- You forgot to include a bearer token with your API request.
- You might not have permission to complete the API request. For more information on what actions users can take, see User Permissions .
- Occasionally this error is from a malformed API request. Check to ensure there are no formatting errors in your parameters.
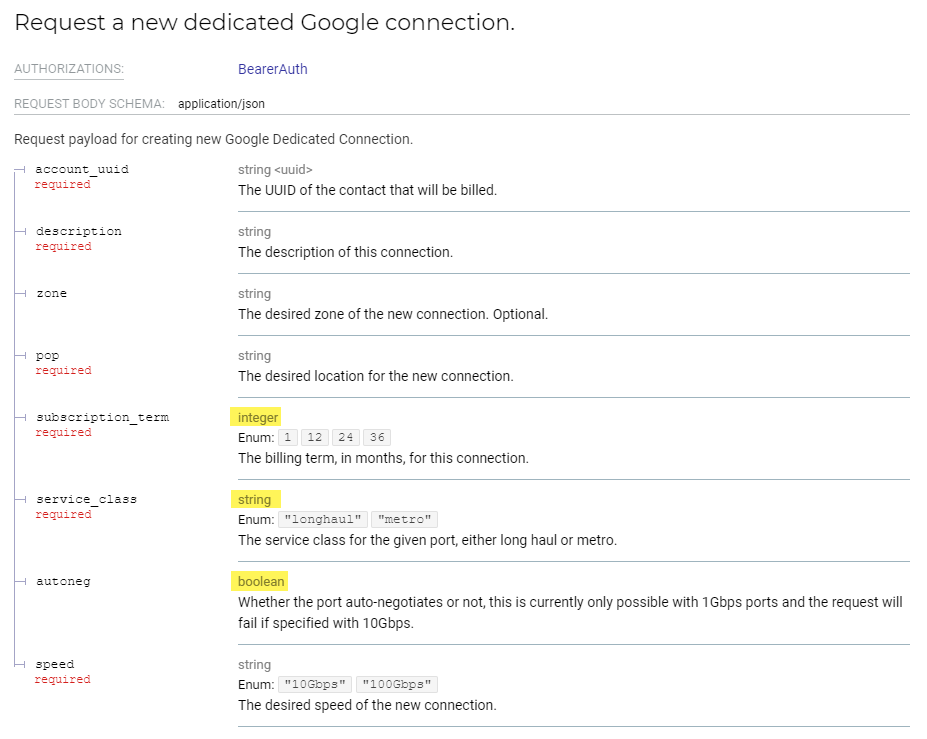
“Invalid value” error
This is typically due to entering a string parameter in the JSON body without enclosing it in quotes. Boolean (true/false) and integers do not need surrounding quotes.
For example, the API call to create a dedicated Google connection includes strings, a boolean value, and an integer.
{
  "account_uuid": "a2115890-ed02-4795-a6dd-c485bec3529c",
  "description": "Connection for uploading cute cat pics",
  "zone": "A",
  "pop": "DAL1",
  "subscription_term": 24,
  "service_class": "longhaul",
  "autoneg": false,
  "speed": "10Gbps"
}
Our API reference lists each parameter type: