Create a Google Dedicated Interconnect Connection
Contents
Order a Dedicated Interconnect in the Google Cloud Console
Create a PacketFabric Dedicated Cloud Connection
Order the cross connect
Confirm the cross connect
Add an untagged virtual circuit for testing
Configure your on-premises router for testing
Add a tagged virtual circuit
Add a VLAN attachment
Prerequisites
- An existing VPC created through your Google Cloud account. For more information, see Google Cloud - Using VPC networks .
- An existing PacketFabric interface that connects your on-premises network to PacketFabric. For more information, see Create a Port .
See Google Dedicated Interconnect Process Overview for a high-level process overview.
Order a Dedicated Interconnect in the Google Cloud Console
-
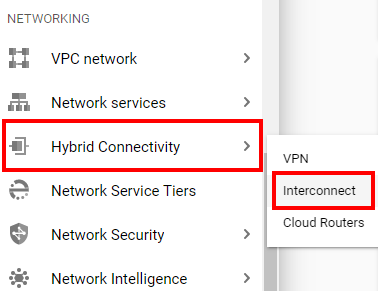
From the Google Cloud Console, click the menu in the upper right to open the product list.

-
Scroll down to Networking and select Hybrid Connectivity > Interconnect.
-
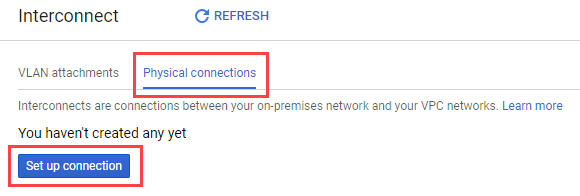
Click Get Started.
Or, if you already have previous VLAN attachments, click the Physical connections tab and then click Set up a connection.
-
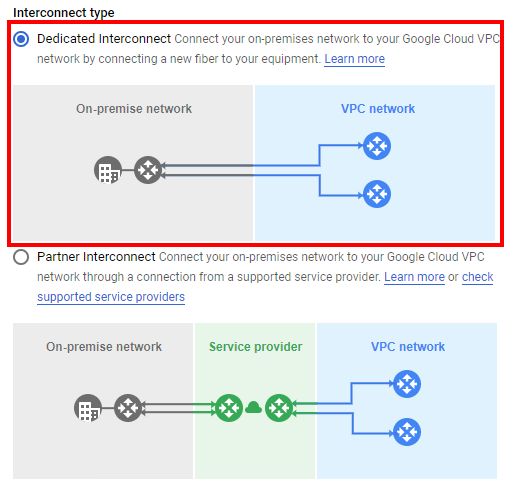
Select Dedicated Interconnect and then click Continue.
-
Select Order new Dedicated Interconnect and then click Continue.
-
Complete the following fields:
-
Click Next.
-
If you are creating a redundant interconnect, complete the fields provided and click Next.
Otherwise, you can deselect Create redundant interconnect. You will be asked to select an availability zone. For example, if you have a connection through another carrier in Zone 1, you would want to select Zone 2. Click Next.
-
Complete the following fields:
Field Description Company name Enter “PacketFabric.” Technical contact You can leave this field blank or enter the email address for your PacketFabric contact. -
Review your information and click Place Order.
Google sends you an email confirming your order. Once Google has allocated the ports, you will receive an email with the LOA attached. For more information, see Google - Retrieving LOA-CFAs .
-
Header row
- Field
- Description
-
r1
- Name
- Provide a meaningful name for the connection.
-
r1
- Description
- Provide a brief description.
-
r1
-
Location
-
Click Choose to select the location for your interconnect.
The location you select must be one in which PacketFabric has an on-ramp.
-
-
r1
- Capacity
- Select 10 Gbps or 100 Gbps.
Create a PacketFabric Dedicated cloud connection
Once Google has sent you the LOA/CFA, you can create a dedicated connection in the PacketFabric portal.
Log in to the PacketFabric portal.
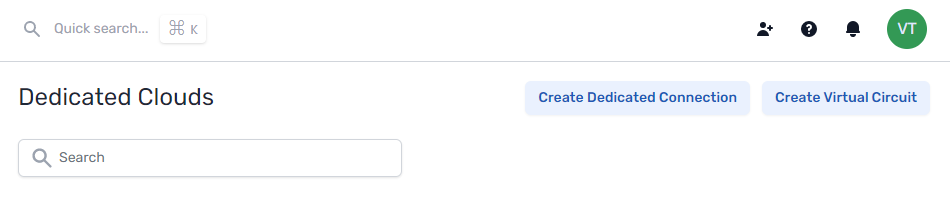
From the Dedicated Clouds page, click Create Dedicated Connection in the upper right:

Complete the following fields:
Select Cloud Provider
Select Google Cloud.
Destination Port
Select the cloud on-ramp port. This is the port that will have a cross connect to Google.
Configuration
Select one of the following:
-
Metro: Your source ports are in the same metro market as your PacketFabric-GCP connection (the destination port you selected in the previous step). This means that you can only access this dedicated cloud on-ramp from your other PacketFabric ports within the same metro/city.
-
Long-haul: Your source ports are not in the same metro market as your PacketFabric-GCP connection. This means you can access this dedicated cloud on-ramp from any PacketFabric interface within the same region.
- Speed
- The on-ramp port capacity.
- Zone
- Select a zone (should be the same zone as you selected when creating your Dedicated Interconnect in the Google Console).
- The zone refers to the physical interconnect diversity between PacketFabric and Google (e.g. different routers).
- Allocating connections within different zones supports redundancy.
- Description
- Enter a name for the connection.
Under the billing section on the right, select a term and the appropriate billing account to use. You can also optionally specify a PO number to associate with the service. The PO number will be included on your monthly invoice.
Click Place order.
Order the cross connect
-
From the PacketFabric portal, go to the Dedicated Cloud page.
-
Click the connection to open its side panel. Click Create Cross Connect.

-
Provide a description for the cross connect.
-
Upload the LOA in the field provided.
-
Click Next
-
The Billing page provides the NRC (non-recurring costs), MRC (monthly recurring costs), and any additional costs (such as a disconnection fee). These fees vary by site.
-
Select a billing account.
-
Click Place order.
You are redirected to the connection details page. From here you can track the progress of the cross connect installation. For more information, see Cross Connects .
Confirm the cross connect
When Google sends you the LOA, they begin automatically checking light levels on the interconnect.
As soon as they confirm the cross connect is in place via light signals, you are sent an email from Google Peering Operations. This confirms that the cross connect is in place and also provides you with an IP address with which to test the connection from Google Cloud to your on-premises router.
To complete the tests, you need to create a PacketFabric virtual circuit to your Dedicated Interconnect (see the following steps).
Add an untagged virtual circuit for testing
The virtual circuit connects your source port to your Google Dedicated Interconnect port. You can have more than one virtual circuit for each Google Dedicated Interconnect, and those virtual circuits can extend to multiple source ports. For several examples, see Google Cloud Interconnects as Part of a Custom Network .
This initial virtual circuit is required by Google to test the connection between its cloud network and your on-premises network. Once testing has been completed, you can begin using your interconnect and Google begins charging you accordingly.
-
From the PacketFabric portal, go to the Dedicated Cloud page.
-
Click Create Virtual Circuit in the upper right of the page.
Complete the following fields:
Select Source
Select the source port. The source port is the PacketFabric port connected to your network.
Select Cloud Provider
Select the dedicated cloud port that you created in the previous section.
Configuration
- Speed
- Select the speed/capacity for your virtual circuit. The speeds that are displayed are those that are compatible with the speeds you selected for your source and destination interfaces.
- Source VLAN
- This is the VLAN ID that faces your source interface (your source network).
- You can manually enter the ID or click Next available. If you click Next available, we find the highest in-use VLAN ID and increment by one. For example, if the highest in-use ID is 15, this field autopopulates with 16.
- Destination VLAN
- The Destination VLAN ID is the VLAN ID that faces Google. Toggle Make destination untagged.
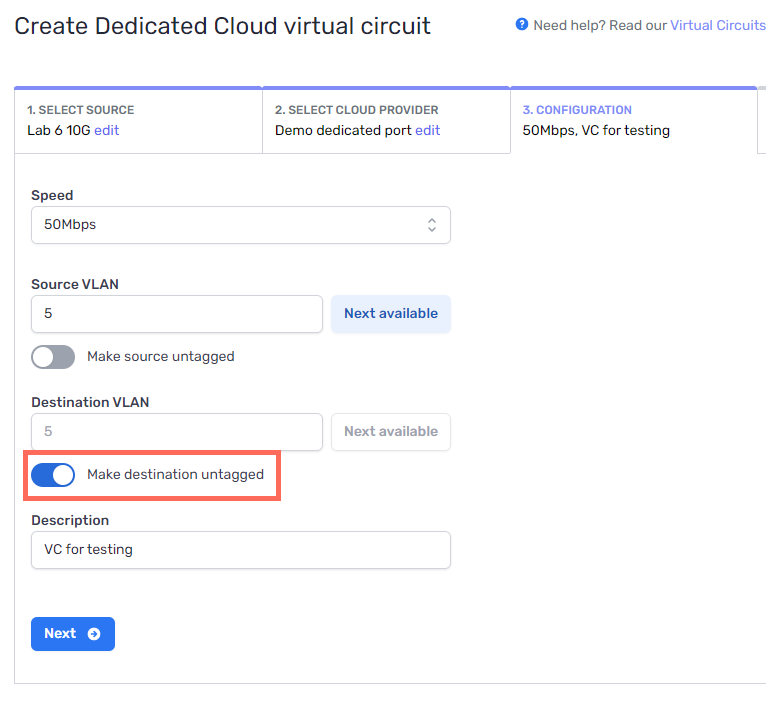
- Description
- Enter a name for the connection.
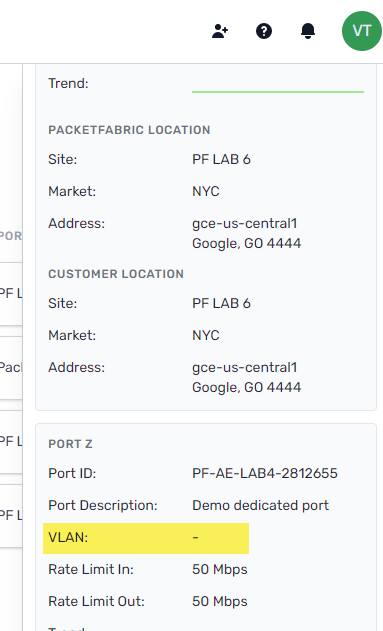
When provisioning is complete, you can view the connection from the Virtual Circuits page. Click the virtual circuit to open its side panel. The Port Z VLAN field is empty:
Configure your on-premises router for testing
Use the VLAN ID for the virtual circuit you just created and the IP address Google sent you earlier (listed under “Your Address” in the email) to configure your on-premises router.
For more information, see Google - Testing connections .
Add a tagged virtual circuit
You can either delete the one you created earlier and create a new one, or edit the existing one to add a destination VLAN ID.
To delete and create a new one, go to the Virtual Circuits page and click the virtual circuit to open its side panel. Select Delete and then follow the steps above, but add a VLAN.
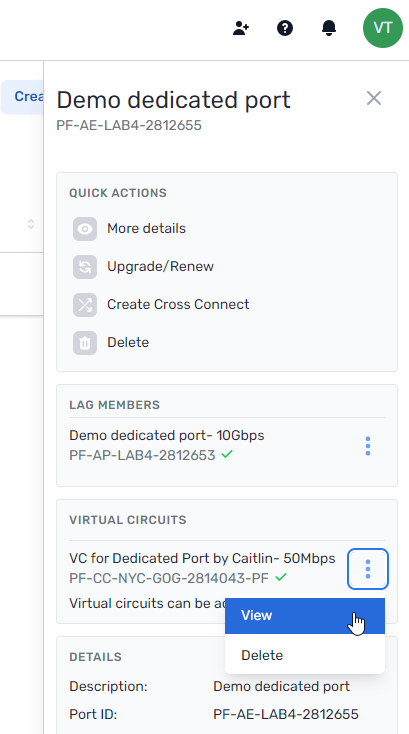
To edit the existing virtual circuit to add a VLAN, you need to go to the circuit’s details page. You can get there from the Virtual Circuits page or from the Dedicated Clouds page:
-
From the Dedicated Cloud page, you can access the dedicated cloud port’s virtual circuits by clicking the dedicated connection to open its side panel.
-
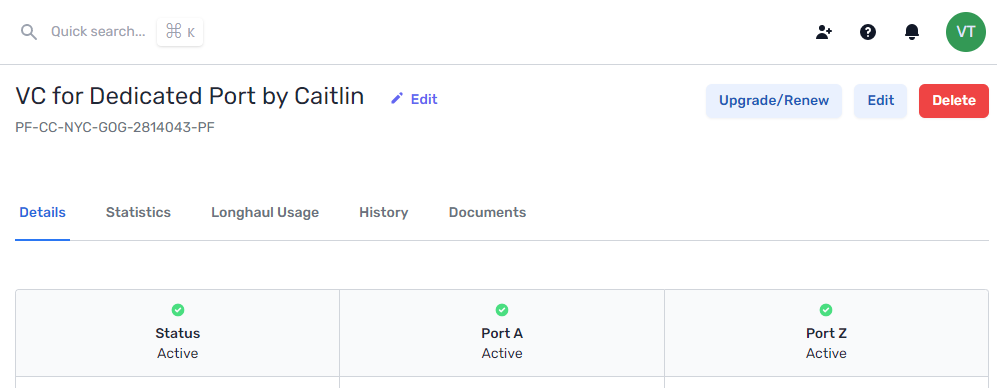
Click the overflow menu and then View to go to the virtual circuit’s details page.
-
Click Edit in the upper right.
-
Toggle the VLAN field under the destination port and then add a VLAN ID:.
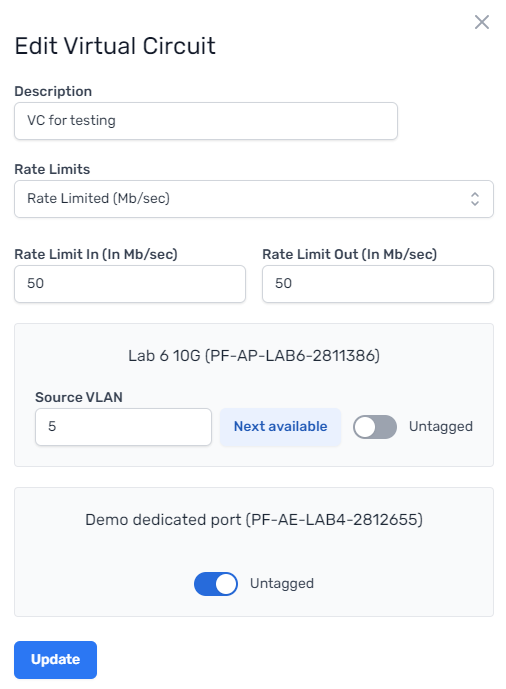
-
Click Update.
Add a VLAN attachment
The VLAN attachment connects your interconnect to your VPC. Every virtual circuit you have must have a corresponding VLAN attachment.
-
From the Google Cloud Console, click the Physical connections tab.

-
You should see your Dedicated Interconnect with the Ready to configure status.
-
Click Finish setup.

-
Click Add VLAN attachment.
-
Complete the following fields:
Field Description Name Provide a meaningful name for the VLAN attachment. Description Enter a brief description. Cloud Router If you have already configured a cloud router for the selected region, you can select it.
Otherwise, create a new cloud router . -
Click VLAN ID, BGP IPs to see advanced configuration options.
IMPORTANT: If you are specifying a VLAN ID and capacity, you must use the same ID and capacity set on your PacketFabric virtual circuit. However, because this is not something PacketFabric can enforce, if done incorrectly you will not see any warning messages. -
Click Done.
-
Click Create.
-
Click Configure next to the attachment you just created.

-
Provide a name for the BGP session and enter your ASN. Optionally, you can also specify route priority. For more information, see Google - Route metrics .
-
Click Save and continue.
Related links
- YouTube - Hybrid Networking: Google Cloud Interconnect (Networking End to End)
- Google - Creating Dedicated Interconnect Connections